Development
The volunteer portal is made of 2 applications. A ReactJS web client and a Ruby on Rails GraphQL server.

Set up your Environment
-
Clone the project
git clone git@github.com:zendesk/volunteer_portal.git cd volunteer_portal -
Install the right version of ruby and node
rbenv install nvm install -
Install dependencies
gem install bundler
bundle install
brew tap heroku/brew && brew install heroku
brew install yarn
yarn install
bundle installmight stop, prompting you to manuallygem install pg. To proceed, dobrew install postgresqlfirst, followed bygem install pg, before continuing withbundle install. -
Install PostgreSQL
The easiest thing is probably to use their app. http://postgresapp.com/
-
Copy the
.env.development.examplefile to.env.developmentcp .env.development.example .env.development
Set up Google OAuth
Use the following links or if they’ve fallen out of date then Google’s Setting up OAuth 2.0 page should guide you through the process.
- Make sure you have an account that has permissions to create projects. You may need to create a new google account. Make sure you’re logged in as this account for all following steps.
- Create a project
- Create OAuth client ID on the Create credentials
page. You may be told
you need to set a project name for the consent screen, follow that link. When
creating OAuth client ID:
- Under Applicationm, select
Web Application - Under Restrictions, fill the fields accordingly,
http://localhost:5000for Authorized JavaScript origins, and,http://localhost:5000/auth/google_oauth2/callbackfor Authorized redirect URIs
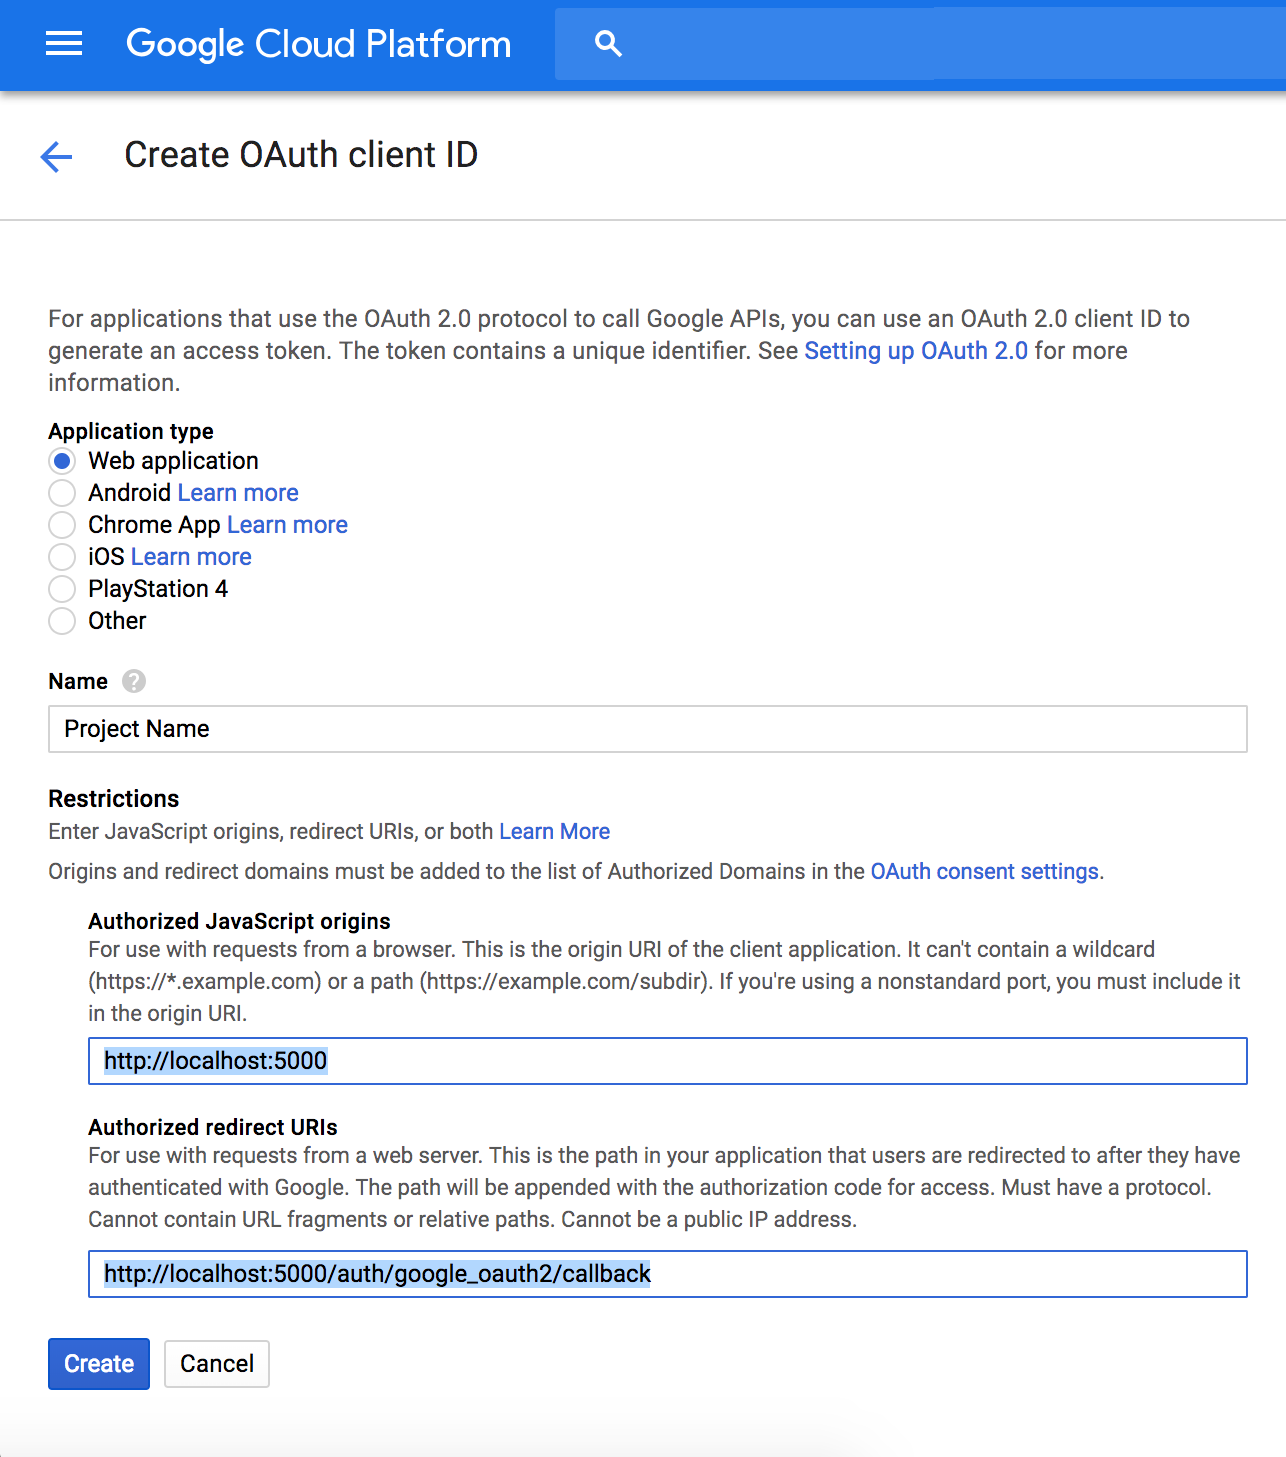 * Hold onto the *client ID* and *client secret*, as you will need to key this into the `.env.development`, respectively as `GOOGLE_CLIENT_ID` and `GOOGLE_CLIENT_SECRET`, later. - Under Applicationm, select
- Create Service Account Key on the Create credentials
page.
- You’ll likely have to create a new service account. I just entered in a
random name and
Project > Owneras the role. - Select JSON as the key type.
- A JSON file will be downloaded. Hold onto the
private_key_idandprivate_key, as you will need to key this into the.env.development, respectively asGOOGLE_PRIVATE_KEY_IDandGOOGLE_PRIVATE_KEY, later.
- You’ll likely have to create a new service account. I just entered in a
random name and
-
Now that you have your OAuth client ID and Service Account Key set up, time to include this as your environment variables. Open
.env.developmentfile and insert the values as below. You should not be updating.env.development.example. Read step 6 in Set up your Environment.HOST=http://localhost:5000 PUBLIC_ASSET_HOST=localhost DATABASE_URL=postgres://volunteer@localhost/volunteer_development ATTR_ENCRYPTION_KEY=aaaaaaaaaaaaaaaaaaaaaaaaaaaaaaaa GOOGLE_CLIENT_ID=your_OAuth_Client_ID GOOGLE_CLIENT_SECRET=your_OAuth_Client_Secret GOOGLE_PRIVATE_KEY_ID=your_service_account_key GOOGLE_PRIVATE_KEY=your_service_account_key - Enable the Google+ API
Start the App
Make sure that PostgreSQL is running.
-
Create and set up your database (you should only need to do this once):
./script/setup_db.sh
To start the app and run it locally, run the command line blow. heroku is used to run both the rails server and the webpack dev server in development. It will run the processes listed in the Procfile
bundle exec heroku local
The server runs on localhost:5000 by default.
Become an admin
- On localhost:5000, create an account, then run this rake command:
bundle exec rake 'volunteer:make_admin[your_email_address]'
Create test data
bundle exec rails volunteer:generate_test_data
Running tests
Rails tests are provided via Minitest and frontend tests with Jest.
Rails
To run backend tests:
bundle exec rake test
Jest
To run frontend tests:
npm run test
lint-stage alongside Husky are used to ensure frontend tests are run on staged files via a precommit hook.
To manually run frontend tests on just staged files:
npm run precommit